Comprehensive Metal Carport Buyer’s Guide
Introduction:
- Are you considering adding a carport to your property?
- Are you confused about the different carport options?
- Are you looking for a quick guide to the carport buying process?
- Are you wondering how much a carport costs in your area?
If you answered yes to any of these questions then our Comprehensive Carport Buyer’s Guide is for you.
Allow me to introduce myself. I am Gardell Strite, owner of Carports4you.
At Carports4you, we have assisted many buyers like yourself with their custom carports and metal building projects. We are an authorized dealer for three of the leading carport/metal building manufacturers in the United States.
Our promise to you is this–we will always give you honest answers about the products we sell and the lead times from purchase to installation. When your purchase is complete, we will continue to serve as your advocate with the manufacturer throughout the installation process.
We believe the best decisions are informed decisions. Therefore, we have provided this Carport Buyers Guide as a resource tool to give you access to pertinent carport information. From manufacturer recommendations to our many years of first-hand knowledge and experience, you will find it all here.
In this guide you will learn:
- Advantages & disadvantages of a metal carport.
- How to determine if a carport is the right solution for you.
- How to calculate what size carport accommodates your needs.
- What design options are available for carports?
- How much will my carport cost?
- About carport foundation types.
- About carport permits and regulations.
If after researching this buyer’s guide you have any unanswered questions please contact me, I would be delighted to assist you.
Thank you,
Gardell Strite
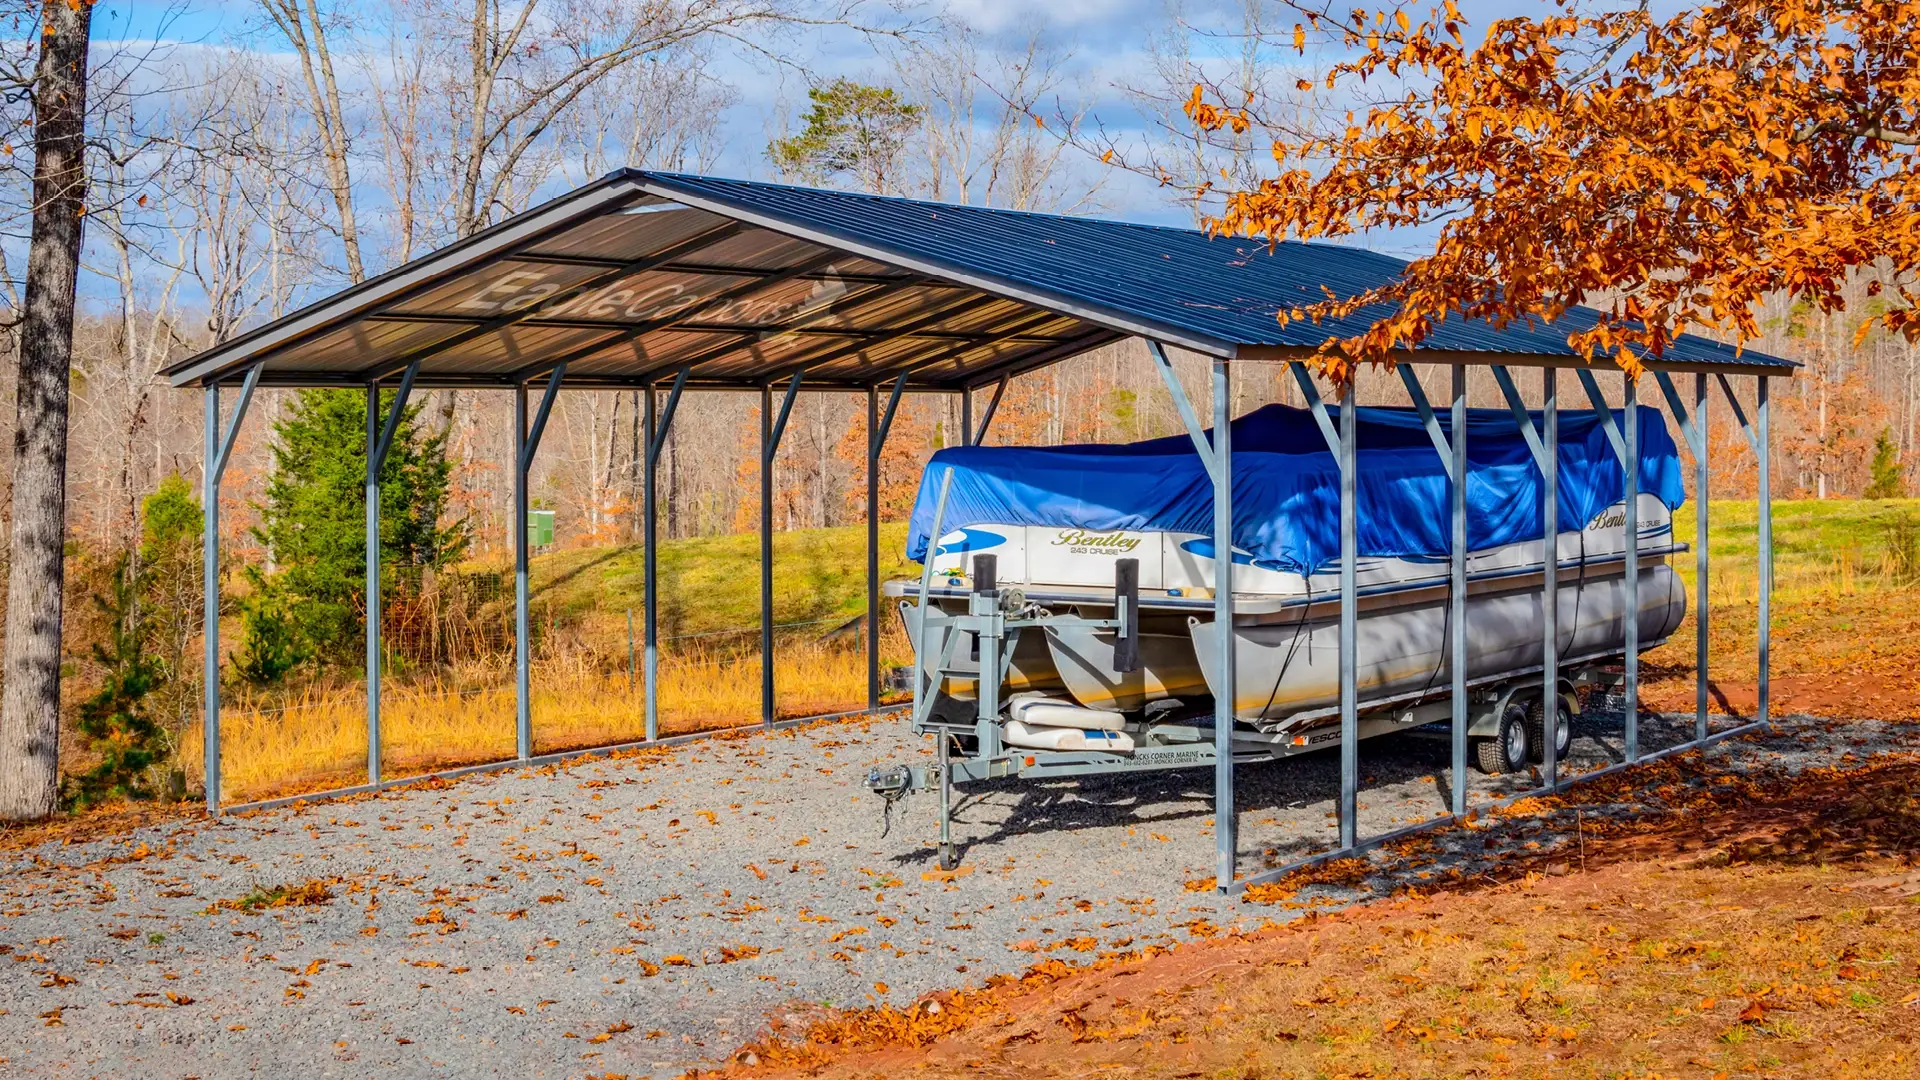
What is a Carport?
A carport is a protective roof structure supported by metal posts and beams with varying amounts of enclosure available. Carports are often used to protect vehicles or equipment from the elements. Think of a carport as a freestanding garage with at least one end open.
Advantages of Metal Carports
- Lower cost than a traditional garage
- Quicker build time than a traditional garage
- Less paperwork than building a traditional garage
- Provides a vehicle adequate protection from the elements
- Often increases property value
- security of an enclosed building
Disadvantages of Metal Carports
- Open air environment provides limited protection
- Does not provide the security of an enclosed building
Is A Metal Carport The Right Solution For You?
While we would be delighted to sell you a carport, first let us consider whether a metal carport is the best solution for your needs.
A metal carport is right for you if…
- You are looking for a low-maintenance vehicle storage solution
The sturdy steel construction of metal carports ensures longevity with little to no maintenance. Metal carports are exempt from dry rot, insect, or fire damage.
- You have a limited budget for your project
Carports are the most economical long-term vehicle storage solution available. That being said, prefabricated metal carports are less expensive than their wood or concrete counterparts.
- You have vehicles or equipment you want to protect from the elements
Carports provide vehicles and equipment adequate protection from harmful UV rays, rain, hail, ice, and snow. Eliminate time spent clearing snow and ice from your vehicle before your commute.
- You don’t enjoy DIY projects but need economical vehicle storage
For those who don’t enjoy DIY projects, our factory installation teams are very efficient and in most cases they can install your metal carport quicker and cheaper than you and your friends can. If you want to install a carport yourself, let us know. We can certainly quote you a price without installation.
- Looking for a vehicle storage solution that adds to your property value
Since carports are very economical, they often add considerably more to the value of a property at resale than they initially cost making them a great return on your investment.
A metal carport is not right for you if…
- If your budget is under $2200
The cost for an entry-level metal carport is approximately $2200, with a two-car carport starting at about $2600. If your budget is less than that, a metal carport may not be a good fit for you.
- If you are looking for theft protection
Carports are open on at least 1 end, which means they do not secure your vehicle from vandalism or theft. If you need theft protection, we suggest you consider one of our metal garages. If you only have a few smaller items or pieces of equipment you need to secure, we do offer carports with an enclosed storage area on one end.
- If you are interested in a carport that attaches directly to your house
Our prefabricated metal carports are designed as freestanding units and are not meant to be attached to the side of your home. The factory installation crew will need approximately 3 feet on all sides of the carport for proper setup. Some building codes may require your carport to be located a greater distance than 3 feet from your residence.
- If you need a carport in a few days
Our carports are custom-made from high-quality steel. This means your order needs to be fabricated, and then installation needs to be scheduled. While this is happening, you may need to obtain a permit for the installation, as well as prepare a foundation if you don’t currently have a suitable area to install your carport.
All of this takes time. Realistically you are looking at several weeks or even more depending on demand at the time of your order. When you contact us we will give you an honest answer about expected lead times between purchase and installation.
Rather than wait a few weeks you might be tempted to run down to your local home improvement store to purchase a carport. We remind you of the old adage, haste makes waste. Will you be satisfied with a carport you can’t customize or upgrade to a higher snow load level or wind rating? A local carport may be constructed from lighter grade materials. Not to mention that you may pay more than necessary and still need to do the installation yourself.
- You belong to an HOA that doesn’t permit carports
If your property is located within a Homeowners Association you will want to verify that carports are permissible before proceeding with a design or purchase.
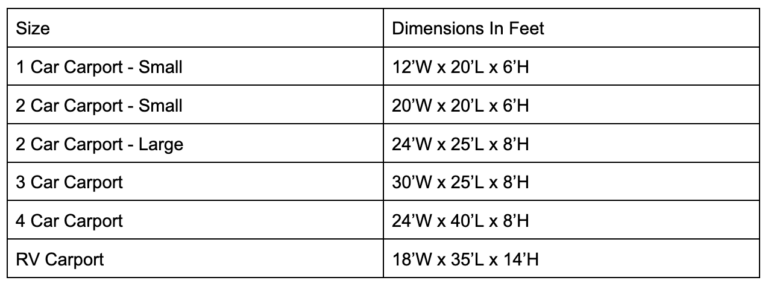
How To Determine What Size Carport You Need
Have you decided that a carport is a good fit for you? Great! Now you’re ready to determine what size carport you need. Use the chart below for a general idea of what size carport will work for you.
Carport Size Customized For You
To determine the exact size carport for your application, use a sheet of paper to draw and record the measurements of your vehicles when parked as in the example below.

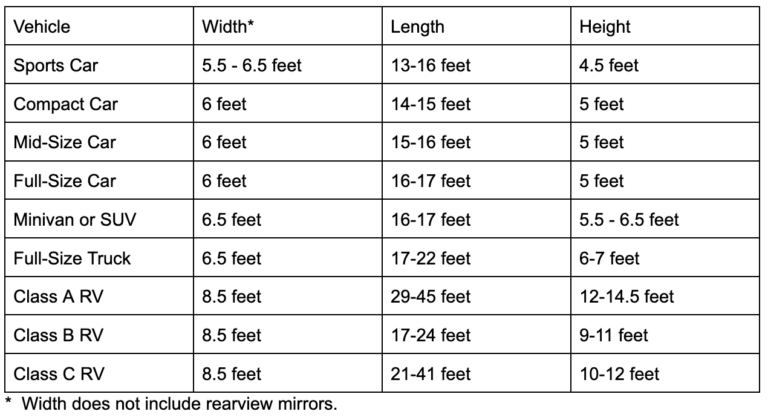
Step 1 - Measure Your Vehicles
Measure the length and width of your vehicles by using a tape measure and the assistance of a friend. If you are unable to measure your vehicle we have provided a chart of approximate measurements for different vehicles to assist you in sizing your carport.
Step 2 - Calculating Your Carport Width
To determine the width of your carport, start with the width of your vehicle(s) and add a minimum of 2 feet of space between the sides of your carport and your vehicles. Now add an additional 3 feet for space between your vehicles if you have more than one vehicle.
If you are enclosing the sides of your carport, in order for your vehicle doors to open, you will need to allow a minimum of 3 feet of space on both sides of the carport instead of just 2 as described above.
Now add an additional 3 in. to both sides for the frame of the carport and you will have the width you need to accommodate your vehicle.
Example: 3” frame + 3’ door space + 6’ vehicle + 3’ between vehicles + 6.5’ vehicle + 3’ door space + 3” frame = 22 feet wide minimum for a full-size car and a full-size pickup truck.
Step 3 - Calculating Your Carport Depth
To provide adequate protection for your vehicle, a carport needs to be several feet longer than your longest vehicle. Ideally, you will want 2-3 feet in front of and behind your longest vehicle. To calculate your carport length take the length of your longest vehicle and add 4-6 feet.
Example: 2’6” space + 19’6” vehicle length + 3’ space = 25 foot carport length
How To Design & Price Your Carport
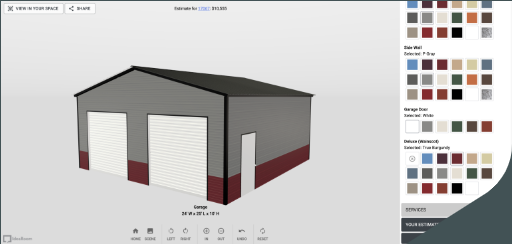
After you have determined what size carport you need, you are ready to start designing your carport. You can give us a call at 618-214-6659 and we will be delighted to walk you through the process, or use our handy online configurator to create a design.
Step 1A: Open The Configurator
Use the carport configurator link below to get started.
Step 1B: Start Building
Enter the delivery zip code so we can provide accurate pricing and building availability. Press “Enter” or click “Start Building.”
Step 1C: Choose your Building Style
Click the “Style” button on the top right side of the configurator, then choose the building style you would like to design. The most common building style for a carport would be “Standard.”
Now scroll down on the right side and choose the foundation you are intending to install your carport on.
Next choose your roof style:
Our carports are available in your choice of three different roof styles. We offer a regular-style, boxed-style, and vertical-style roof. The biggest differences in roofing styles are in the direction the roof sheeting panels run and how they intersect with the side wall panels.
Regular Style features a roof system that wraps down around the edge of the roof onto the side panel. The roof panels in this style run in the same direction as the roof peak itself. If you were considering adding rain gutters to your carport you would not choose this style. This style would tend to hold snow on the roof rather than let it slide off. The regular style carport tends to be the most economical.
Boxed Style features a roof system with a pitched roof that extends beyond the side panels. The roof panels in this style run in the same direction as the roof peak itself. If you were considering adding rain gutters to your carport you would not choose this style. This style would tend to hold snow on the roof rather than let it slide off.
Vertical Style features a roof system with a pitched roof that extends beyond the side panels. The panels on this roof run in the opposite direction of the peak, making it ideal if you are intending to add a rain gutter or live in a heavy snowfall area. This style sports the strongest roof system and is highly recommended for larger carport sizes.
Now choose if you want to add an enclosed storage area to your carport. If so, where would you like that storage to be located? Watch the building design change on the left as you choose different storage locations on the right.
Step 2: Choosing Your Carport Dimensions
Click the “Size” tab on the right side and enter the dimensions you determined earlier for your carport. If you need a custom dimension not available in the configurator, choose the next size larger so your price is calculated correctly, and then mention the size change requirement when we communicate during the order process.
Height: We recommend choosing a leg height that is one foot taller than the height of the tallest vehicle you plan to store in your carport. For RV storage, remember to include the height of the AC units on the roof. Don’t make your open carports too tall or they lose the ability to protect your vehicles from the sun or weather elements.
Step 3: Enclosing Your Carport
Here you will determine which parts of your carport will be enclosed, start by clicking on the section marked “Center Section”. If you want your carport to be totally open, set the gable ends and sidewall options all to open. If you desire to have only some sides enclosed, make your selection using the dropdown menu for that side and watch the change being applied to your building on the left.
After you are finished applying your level of enclosure, you can add a lean-to to the carport if you choose. Select the side you would like to add an additional lean-to and then select a lean to only or a lean-to with storage.
To protect children and pets from sharp edges on the steel panels, we recommend choosing the J-trim option if you are adding partial sides or end panels.
Step 4: Selecting Additional Upgrades
Click the “Additional Options” tab on the right and choose any upgrades you prefer to add.
- Frame Gauge: Please note a lower number means thicker steel. (12 gauge is thicker than 14 gauge). In areas where you receive lots of high winds or heavy snowfall, we recommend upgrading to 12-gauge frames. Contact us if you need a hurricane-certified carport.
- Colored Screws: If you want the screws to match the building color, choose this option.
- Mobile Home Anchors: Choose this if you are anchoring your carport into a dirt, stone, or pavement foundation.
- Concrete Anchors: Choose this if you are anchoring your carport onto a concrete slab.
- Panel Upgrade: A lower number means thicker steel panels.
- Insulation Material: Only choose insulation material if you are enclosing your carport.
Step 5: Choosing Doors, Windows, and Frameouts
Select the “Doors, Windows, and Farmeouts” tab on the right. This section only applies if you are enclosing your carport.
Select the “Center Section” and then click and drag your building on the left until the side you desire to design is facing you. Now double-click the door or window you desire to add to an enclosed wall, then drag and drop it into place. When you are done with one side of your building, click on the building and drag it to turn to another side, and continue. Repeat the process for any lean-to you may have added.
Step 6: Choosing Colors For Your Carport
Click the “Colors” tab on the right to begin choosing colors for your carport. You will want to put some thought into this as you will live with these colors for decades to come. Be sure to choose the correct color for every option you are given. You can see where the color is applied by turning your building and clicking colors to see what is changed.
You can go with all the same color or choose different colors for different sections. It is fairly common to make the roof a different color than the side panels on enclosed carports. Some people match the roof and trim colors, while others don’t. Be creative and observe your building from all angles before finalizing your selection.
Be aware dark colors such as black get very hot in the summer sunshine, whereas lighter colors and galvalume tend to reflect sun rays and absorb less heat.
On enclosed buildings use the Deluxe Wainscoting option to add a 2-tone effect to the sidewalls.
Step 7: Choose Additional Services
- Install Over Existing Structure: Choose this if your carport will be built overtop of any existing structure such as a pump house or piece of stationary equipment.
- Install On A Dock or Deck: Please note while building a carport on a dock or wood deck is fine, it must be stationary rather than floating. Please check with us to confirm that this is possible in you situation.
- Install On A Wall: Building a carport on top of a wall up to 3 feet high is fine, just choose this option so we are prepared to do so.
- Cut Legs Onsite: Choose this option if your foundation is not level.
Your estimated price should now appear in the bottom right corner of the configurator. Click the “Save” button to save your carport while you give it more thought. If you want to make changes later, or if you want the design emailed to you, fill out the required information and print your design or have a link emailed to you for later changes.
If you are satisfied with your design, click the “Submit Quote” button and fill out your contact information to receive a detailed quote.Make a payment if you are ready to purchase.
What You Need To Know About Permitting & Regulations
Many local governments require a permit to install a carport on your property. Follow the steps below to determine what is required in your area.
Step 1: Check CC&R’s
What are CC&R’s? Covenants, conditions, and restrictions, otherwise known as “CC&Rs” are a set of rules governing the use of a certain piece of real estate in a given community.
If you live in a rural area you likely are not governed by any CC&R’s and only need to be concerned with any township or local government ordinances.
However, if you live in an urban or semiurban area you may find your property is subject to a set of guidelines from a local HOA (Homeowners Association) which you became a part of when you purchased the property, or to a set of CC&R’s that were part of your purchase agreement.
If you are a member of an HOA, a simple phone call to the head of the organization should determine what carports are permissible. If you are not a member of an HOA, you may want to leaf through your property settlement paperwork to see if any property restrictions were conveyed to you at the time of purchase.
Step 2: Check Local Government Regulations
Many local municipalities have a website with the zoning rules and regulations posted where you can do your own research. It may be more efficient for you to call your local government office and ask if there is any regulation in place for carports in your area and whether you need to apply for a permit.
How do you locate the phone number to call?
You are looking for the planning commission or zoning officer in your local township or county depending upon which state you live in. Doing an internet search for your township government office or county government office will often yield contact information. Calling the provided number and explaining what you need to the receptionist will generally yield the correct phone number for your municipality zoning or planning officer.
Before you make the call have the following information ready:
- The address for the property where you are intending to place a carport.
- Where on the property you are wanting to place it including how many feet from any existing structures or property lines.
- The width, length, and height of the carport you intend to install on the property.
Here is a list of questions to ask the planning or zoning officer:
- Is my property under your jurisdiction?
- Are there any regulations on carports?
If carports are regulated in your area, here are some follow-up questions
- Are there any height restrictions?
- Are there any setback restrictions from existing structures or property lines?
- Are there any requirements for a foundation?
- Are there any inspections needed?
- May I place a carport in front of my dwelling or must it be on the side or in the rear?
- Do I need a permit to install a carport?
If a permit is required here are some follow-up questions you should ask.
- How do I obtain such a permit?
- What does this permit cost?
- How long does it take to get this permit?
- Are certified plans required for a permit?
- Are there any wind gust or snow load certifications required for obtaining a permit?
- Is there an online application to obtain a permit?
Be sure to take notes of the information you learn in order to make the process go smoothly. You are not quite ready to obtain the permit so just hold onto the information you gather till you are ready to obtain the permit.
Choosing A Site For Your Carport
Step 1 - Locate A Level Spot
If a carport is permitted on your property grab a tape measure and head outside. You are ready to identify an ideal location that complies with any regulations you are subject to. The best locations are level or very close to level. Please note level does not carry the same meaning as flat. Level means not only is the location flat but it doesn’t slope one way or the other.
If you can’t find a location that is level, you will need to choose one that you can make level. If you are intending to build the carport on a concrete or asphalt pad we recommend that the concrete or asphalt area be 1 foot wider and 1 foot longer than the dimensions of your new structure. For example, if you ordered a 12’ wide x 20’ long carport, then you need a concrete or asphalt pad that measures 13’ wide x 21’ long. If your intention is to build over a dirt or gravel/stone pad we recommend the pad be 2 feet wider and 2 feet longer than the structure dimensions.
Step 2 - What Is Overhead?
Is there anything above your carport site location that will be problematic? If there are trees with overhanging branches, you will want to trim them back before installation. You will need clearance of at least 5 feet higher than the leg height of your carport.
Overhead utility lines are a safety hazard during carport installation. Find a location that is free from overhead power lines above or within 20 feet of the installation site. If you need to install a carport under an overhead powerline please contact us to discuss your options.
Step 3 - Stake Out the Corners & Measure Setbacks
When you have identified a level site free from overhead obstructions, you are ready to mark the corners and check the setbacks. Use a stake, stick, or flag to mark a corner, then measure the width and length of your carport placing a marker at each corner. When you have the footprint of the carport staked out, take a few steps back and make sure it is square and the position of the entrance is where you want it.
Now use a tape measure to determine if your site meets the setback requirements from any property lines or existing structures. When considering proper setbacks from a roadway, remember road easements often extend beyond the paved surface area of the road.
Step 4 - Consider What Is Not Visible
Does your property have any rights of way or easement crossing it? These areas are generally off-limits to any permanent structure.
If you will be doing any digging or excavation in preparation for your carport installation you will want to be sure nothing lurks underground BEFORE you dig. Call 811 or visit call811.com to request all underground utilities at the site be marked before you dig. If you find utilities running through or near the site, you may have to relocate your site.
Designing & Pricing Your Carports Foundation
The following are all viable carport foundations:
- Existing driveway
- Asphalt
- Concrete slab
- Gravel pad
- Ground
Existing Driveway
While it is very popular to use your existing driveway as the carport foundation, please be sure the existing driveway is level. We cannot install a carport if one corner of the surface is more than 3 inches lower than another. There are two methods for carport installation over an existing driveway.
- If your new carport will be wider than your existing driveway we can attach the frame to the ground beside the driveway by using mobile home anchors.
- If your driveway is wider than the carport we can attach the frame to the surface by driving our anchors through the driveway surface. In the event you have a concrete driveway concrete anchor bolts will be used to secure your carport to the concrete surface.
Asphalt
Using asphalt for a carport foundation may be an excellent choice for some applications and a less-than-desirable choice for others. Consider the pros and cons of asphalt foundations below.
Asphalt Pros
- Considerably cheaper than concrete
- Works well in climates where the ground freezes and thaws.
- Works well in areas where salt is used to melt ice and snow.
- Grease and oil stains blend into the asphalt.
Asphalt Cons
- Pliable; deforms under heavy loads or in extreme heat.
- Requires maintenance; needs resealing every few years
- Lacks the longevity of concrete.
If you live in a climate that has freezing temperatures and lots of ice and snow, asphalt may be a great carport foundation for you. If not, concrete or gravel may be a better choice for you.
Concrete Slab
A concrete slab is the best foundation for a carport; however, it is also the most expensive. If you hire a contractor to pour you a concrete slab it could cost you more than the carport. If you enlist a friend to help you with this DIY project you can save a considerable amount of money.
Advantages of Concrete Slab Foundations
- Longevity
- Dye can be added to create custom colors
- Surface can be stamped for custom design
- Low Maintenance
Disadvantages of Concrete Slab Foundations
- Expensive
- Road salt damages the surface
- Footer needs to be below the frost line in freezing climates
Gravel Pad
Gravel pad foundations are the most popular and most cost-effective base for a metal carport. Many DIY projects are done using gravel due to the ease of installation and economical price.
Gravel Pad Pros
- Ease of installation
- Economical
- Great for leveling a pad area
- Porous, allows water to pass through
- Readily available
Gravel Pad Cons
- Can become dirty
- Needs additional gravel added over time
If you intend to use gravel to construct your own carport foundation here are some construction tips and answers to some frequently asked questions.
How do I prepare a gravel carport pad?
- Begin by removing the topsoil with a shovel.
- Level the site as much as possible, removing excess dirt.
- Cover the area with a woven geotextile fabric or driveway fabric underlayment.
- Put 4-6 inches of stone overtop the landscape fabric.
- Use a compactor or tamper to firm up the stone base.
- Observe the pad for low spots and relevel with a shovel.
How big should a gravel carport pad be?
Carport manufacturers recommend a gravel pad be at least 2 and preferably 3 feet wider and longer than your carport. This will prevent the gravel from being loosened under your carport frame and prevent the rain from splashing mud into your carport.
How deep should gravel be for a carport?
We recommend a minimum of 4 inches of gravel and preferably 6 inches.
What kind of gravel should I use for a parking pad?
If you are using a fabric base to keep the stone from getting lost in the dirt, the best gravel for a carport is a ¾” crushed stone mixed with a smaller size or lime dust. This blend has a different name depending on what part of the country you are located in. If you call your local quarry or stone hauler and tell him what you are looking for they will know what to bring you.
If you aren’t using a driveway fabric underlayment for a base, then we recommend putting down 3 inches of larger ballast stone first, topped by 3 inches of the above-mentioned blend is preferable. This method is often more expensive. In areas that tend to be wet, you may want to use the driveway fabric underlayment, along with the two layers of stone.
How can I prevent water from pooling under a gravel carport pad?
The ground around your carport pad should slope away from the pad slightly. Grading the earth around your carport to slope away at 6 inches in 10 feet is ideal for allowing rainwater to run away from your carport.
How much does a gravel pad cost?
The materials for a 23’ x 23’ gravel foundation will probably cost $400 – $600, including delivery.
- Driveway Fabric Underlayment – $120
- Stone Blend with Delivery – $300 – $500
If you are not able to do the work yourself, you will need to hire a local excavator to do the work for you.
Ground Pad
A ground pad can work for a carport if your local regulations allow it. This works best for storing occasional-use farm or lawn equipment and is not ideal for storing vehicles used on a regular basis. Mobile home anchors are used for this type of installation.
Obtaining Financing For Your New Carport
The steps above should give you a good idea of what your carport project is going to cost. If you don’t have that much cash, financing options are available. You will need to pay a deposit of up to 18% when the order is placed and the balance isn’t due until after the installation is complete. In some cases in larger installations the company may require 50% of the remaining balance at time of scheduling. Both amounts are payable with any major credit card. A credit card fee may apply.
Carport Finance Options
Zero-interest credit cards are a simple, low-cost way to finance your carport project. Some of these cards are available without any interest charges for 21 months. If you choose this option, read the terms carefully and make sure the card you apply for has a credit limit high enough to cover the expense for the entire project.
Personal loans are a better option if you are going to need more than the interest-free timeframe a credit card offers you to pay for your carport. These can be obtained at a local bank, credit union, or peer-to-peer lending sites.
Manufacturer financing programs are another option at your disposal. If you would like more details on manufacturer financing please contact us at 618-214-6659, we will be glad to give you details on these plans.
Submitting A Carport Order
When the payment details are figured out you are ready to place your order. If you saved your design, find the email with the link to your design and open the design in our configurator.
Verify the design is exactly as you want it, then submit the design for a quote and our team will reach out to you with the next steps.
Can’t find the design you saved? No worries! You can start over again using the configurator link below or contact us and we will be glad to place your order for you.
Preparation For Delivery of Your Carport
After you have placed your order and made your down payment, you will need to start preparing so everything is ready for installation day.
Step 1 - Obtain Permit (If Required)
If a permit is required in your area, apply for it now. In rare instances, local governments require the manufacturer to apply for and/or pick up the permit rather than the landowner. If you discover this to be the case in your area please let us know ASAP.
If your local government requires a set of generic engineer plans to review, let us know ASAP. We will get the plans on order and you will receive them by email from the manufacturer in 1-2 weeks. If your local government requires “wet seal” plans (plans that have been physically stamped with a seal) let us know and we will have them mailed to you.
If your local government requires a site plan, draw a sketch of your property. Show the property boundaries, the location of the carport, and the location of other buildings, wells, and septic fields.
When you have the required documents in hand, finish filling out the application and scan a copy or take a photo of each document to email to us. Now take your completed application and payment for the permit fee to your local government office and submit the application.
When you receive your permit, send us a copy, so we’ll know this step is completed.
Carport Site Preparation
If your carport is to be installed on the ground or a gravel pad follow steps 1-6. If your carport is being installed on a concrete pad, asphalt pad, or existing driveway you can jump to step 6.
- Mark the four corners with a flag or stake.
- Measure to be sure the length of each side is correct.
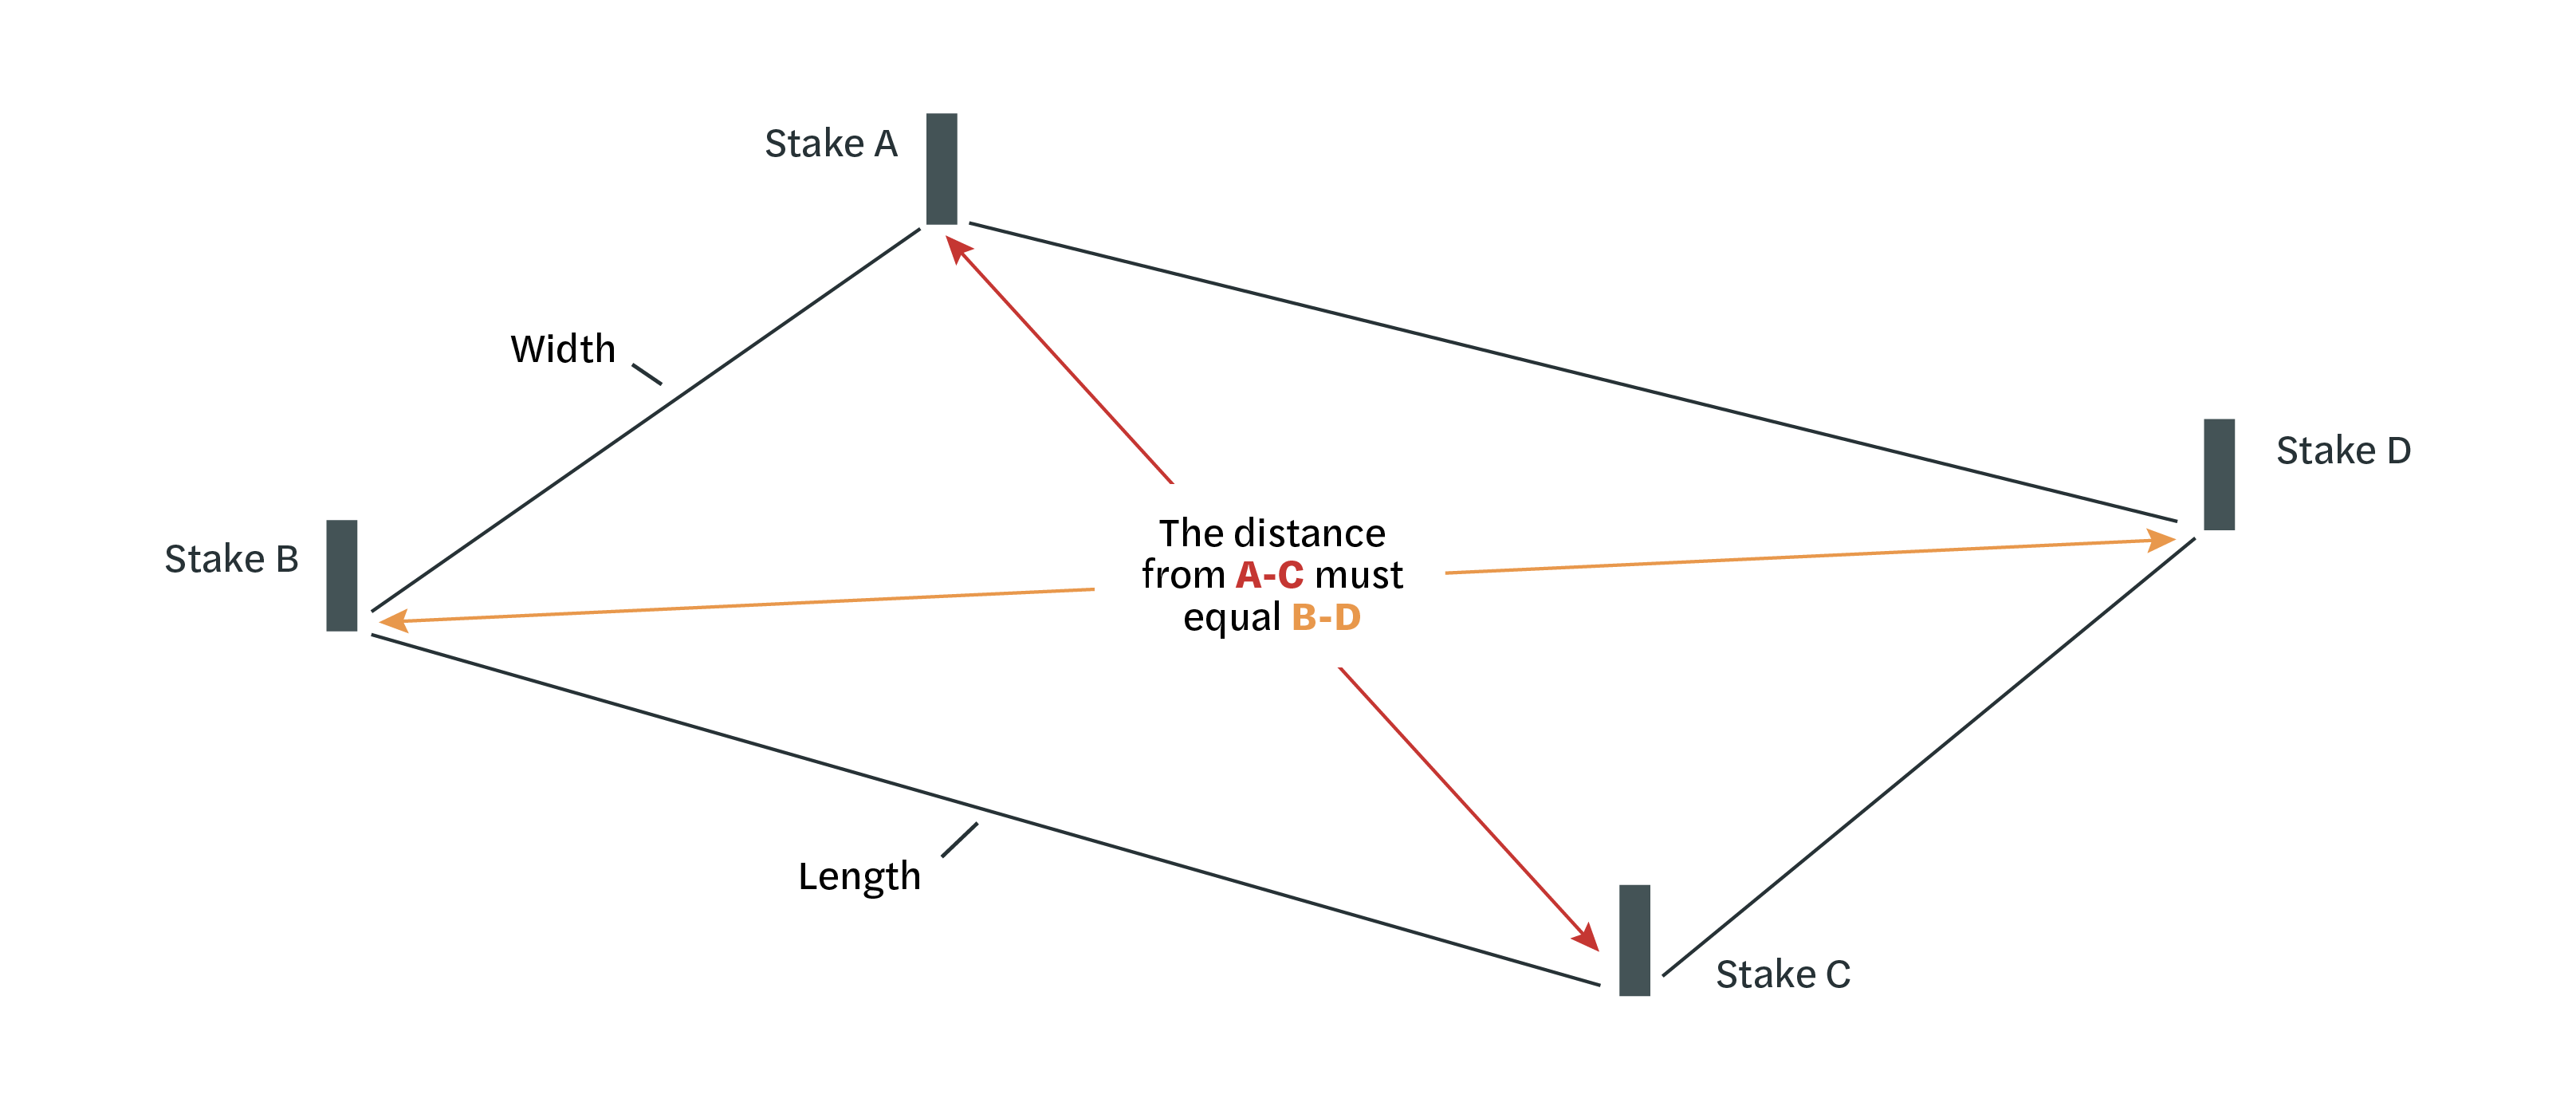
- Measure to be sure that the diagonal distance between two opposite corners is the same as the distance between the other two opposite corners.
- Make sure all sides are level and there are no low or high spots.
- Make sure there are several feet free of any obstructions around the perimeter of the carport pad so the installation crew has room to work.
- Send us a photo of the prepared site taken from each of the 4 sides. Be sure to stand back far enough to get the entire installation site on each photo.
Schedule Carport Delivery
When we have a copy of your permit (if required) and the photos of your prepared installation site, we will get your order in the queue for scheduling.
Haven’t ordered your carport yet? Submit your order today!
Waiting For Delivery Day
Waiting for installation day can be the most difficult part of the carport purchase journey. A peek into what goes on behind the scenes may help with the wait.
Here is how the process works:
- You place your order and make a downpayment.
- You obtain your permit and complete site preparation.
- You send us photos of the permits and job site, letting us know you are ready for installation.
- Your job is put in the queue of orders.
- When there are a number of orders for a job route to be scheduled through your area, you will get a call to let you know which day your carport is scheduled to be installed.
Please note: this means the time from notice of installation until installation may only be a few days in advance. It also means because this is a multiple-stop job route, if there are complications on the installation job ahead of you, the crew may have to call you and move your installation back a day or in rare events even reschedule.
Carports4you does everything we can to give you an accurate delivery time frame. If there are unforeseen changes to your expected delivery time we will try to keep you informed.
Metal Carport FAQ’s
Didn’t find all the answers you are looking for? Visit our Carport FAQ’s page.
In Conclusion
Our sincere desire was to answer your questions as you research a carport purchase. If you have other questions not answered in this comprehensive guide, please reach out to me and I will do my best to provide the information you need to make an educated decision.
May your carport-buying journey be an enjoyable one!
Thank you,
Gardell Strite
618-214-6659